Pentax 645N + Nikon F100 | Kodak Portra 400 | Scanned by Photovision Prints
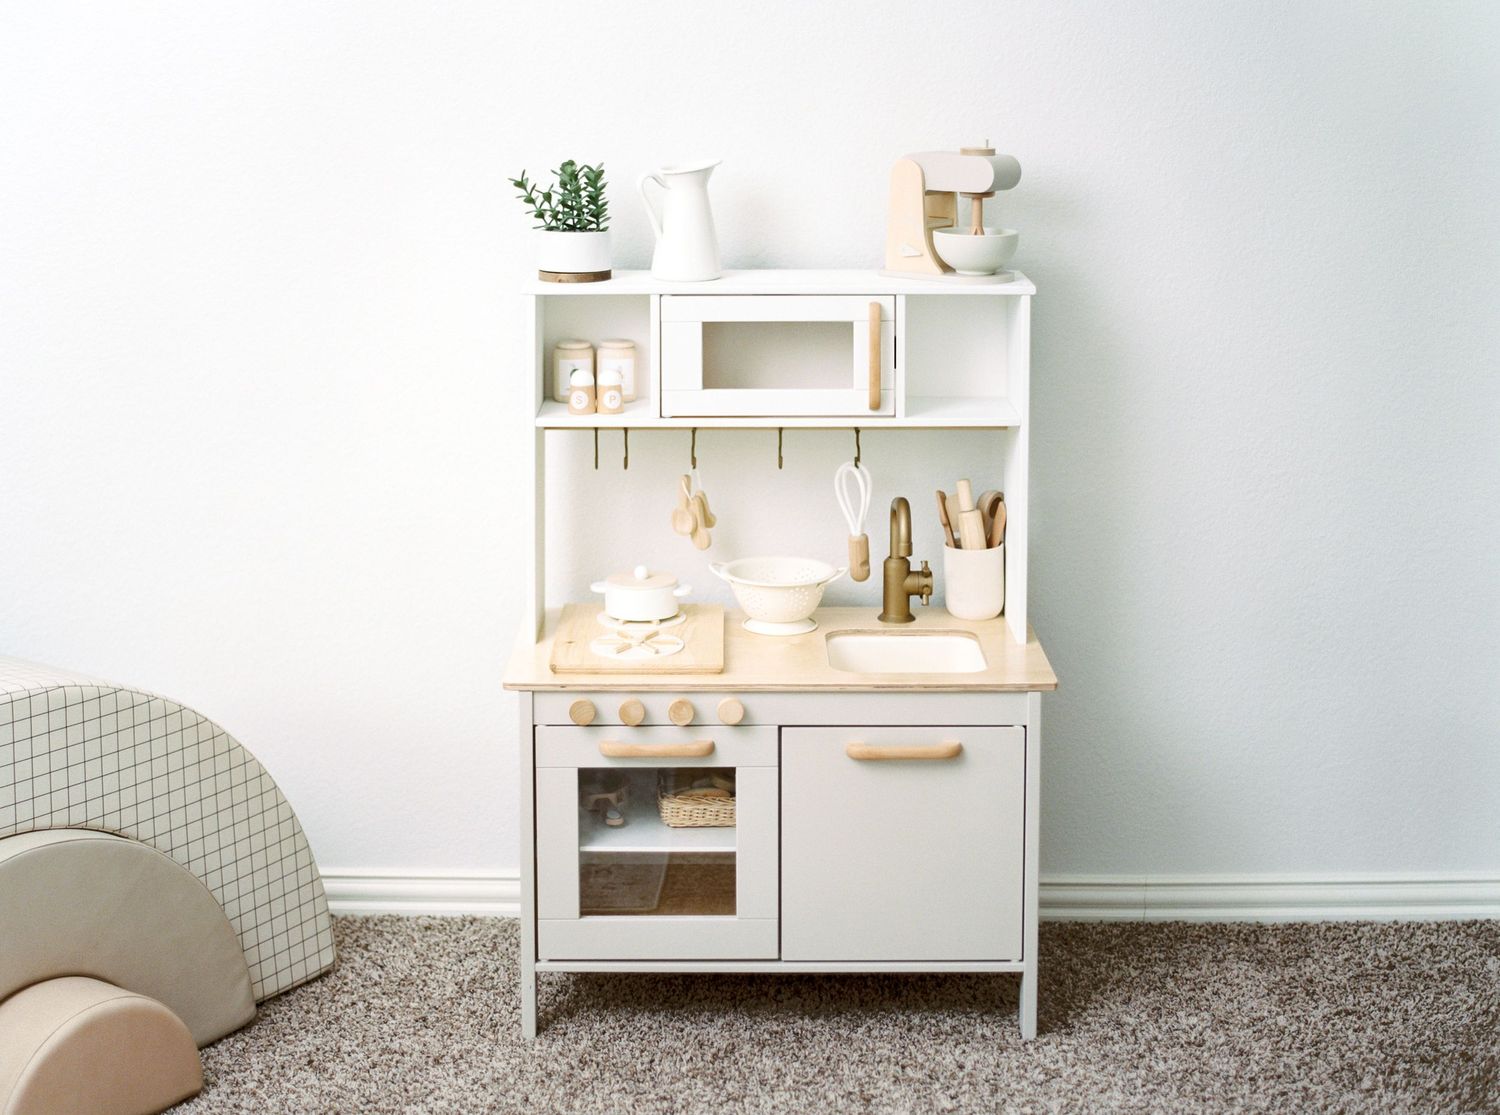
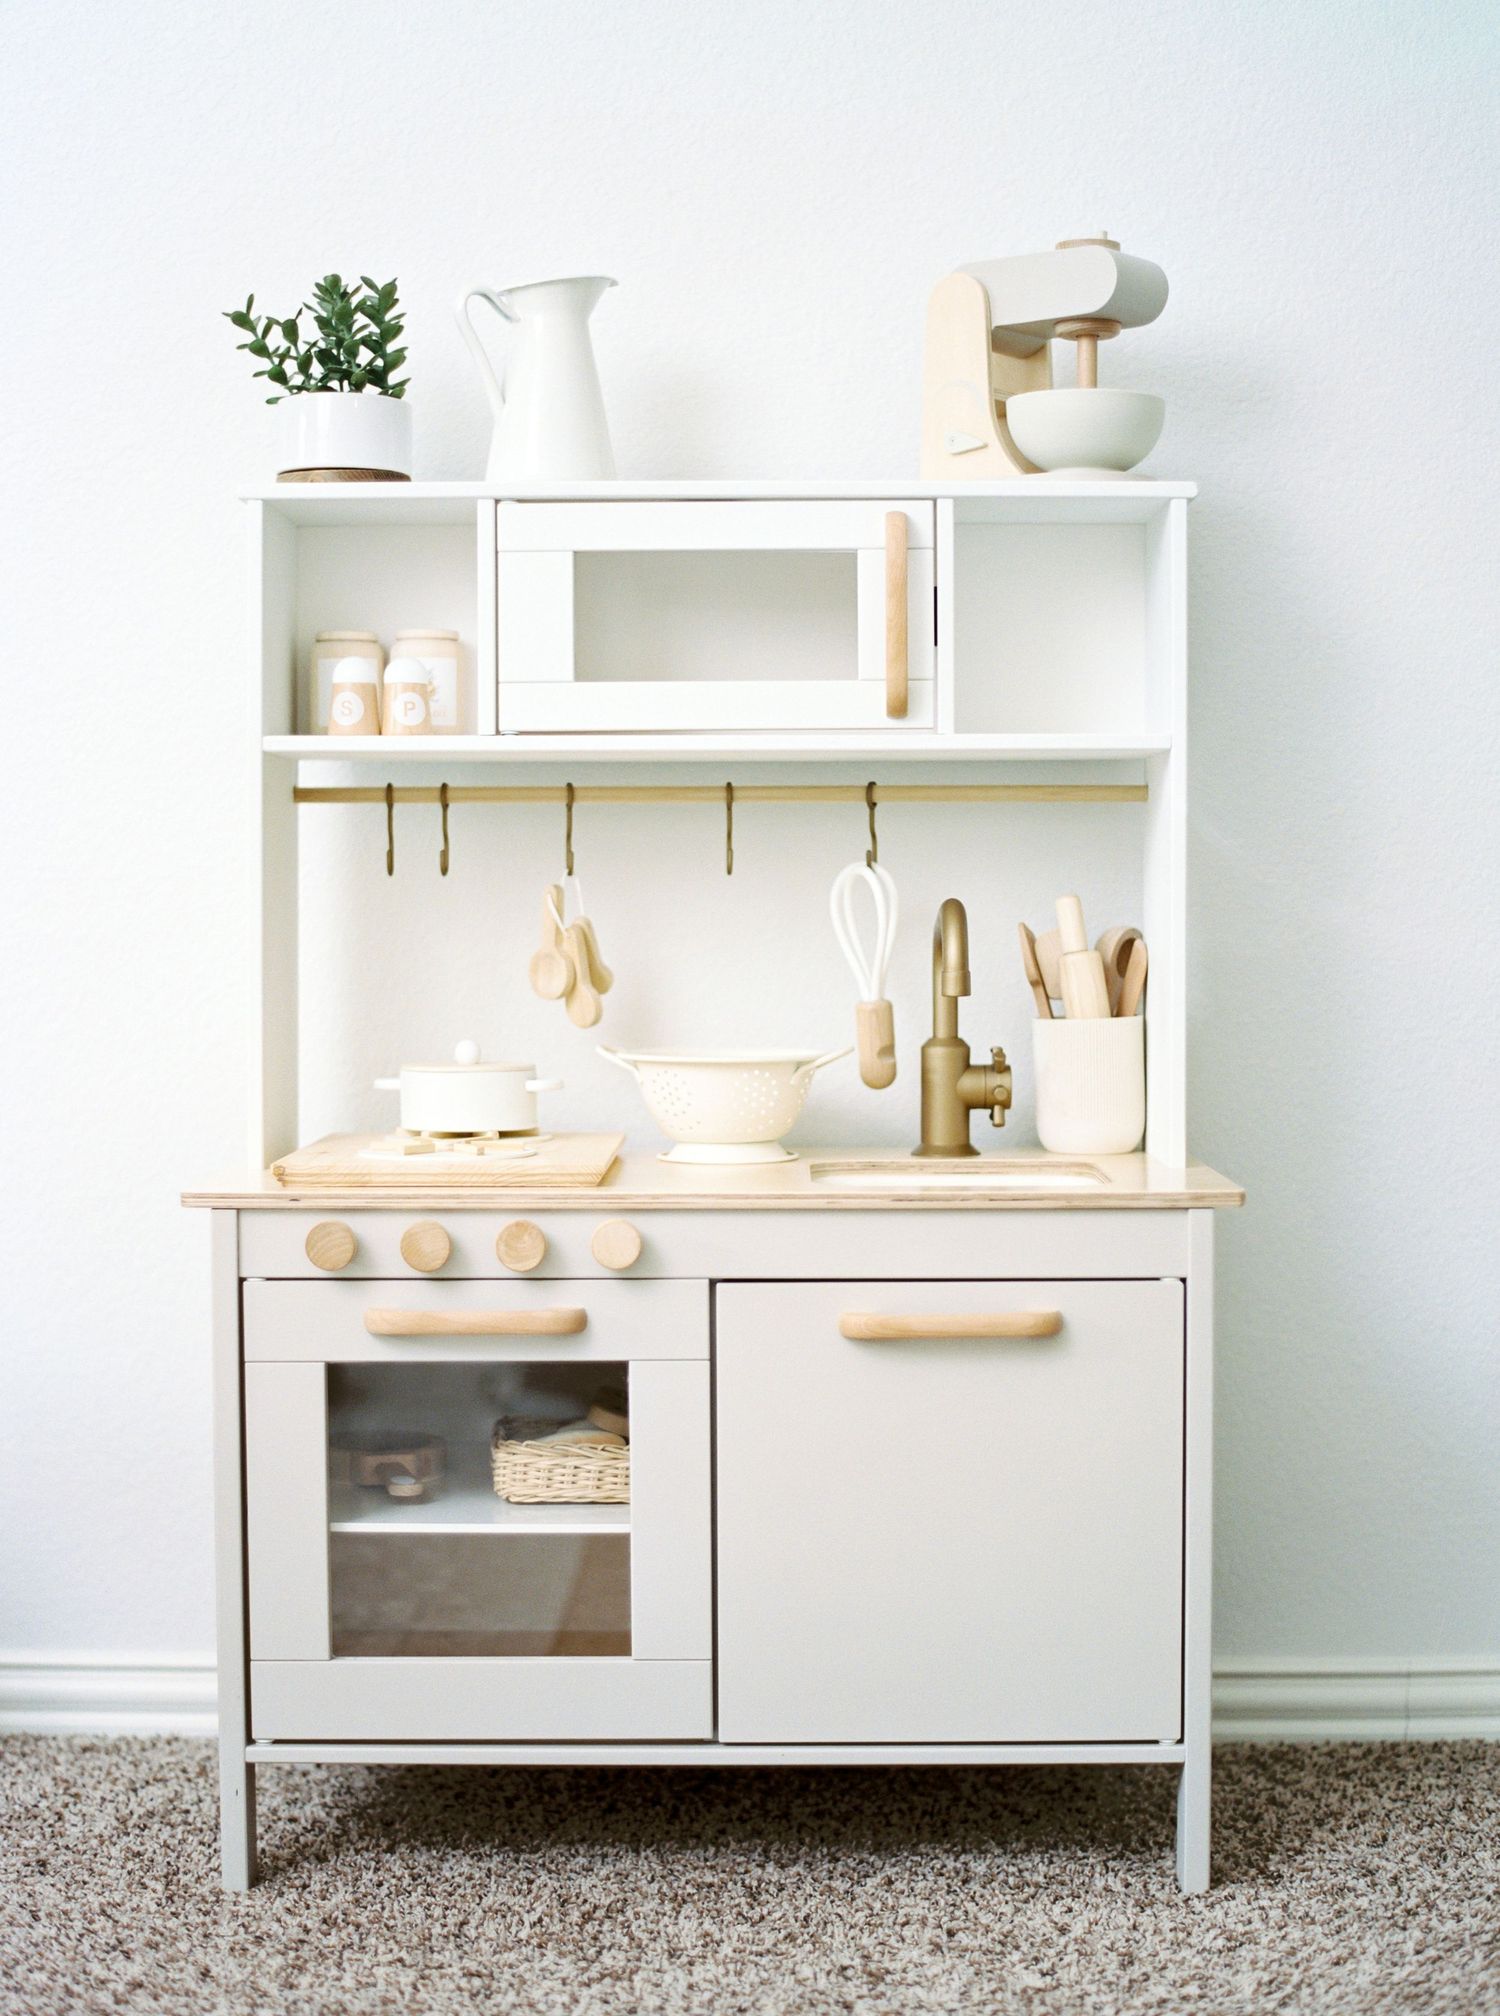
I'm so excited to finally share the reveal of my IKEA Duktig Play Kitchen Makeover! I've always wanted to makeover this play kitchen after pinning so many adorable designs on Pinterest, and well I knew whenever our baby came, that this would be a project I'd eventually take on. I completed this just shortly before Parker's first birthday and I put in the work that will hopefully make this last for years to come. It’s not done in the sense that I’ll keep adding toys if I find more cute and appropriate ones that’ll grow with her. It was truly a labor of love from me (20 hours over a span of 2 weeks) that was both my creative and therapeutic outlet. This was a fun project that I don't necessarily think I would want to do again or have time for in the next 5-10 years, but I definitely enjoyed myself during the process and loved seeing it all come together. Check out what I did to bring my design to life!

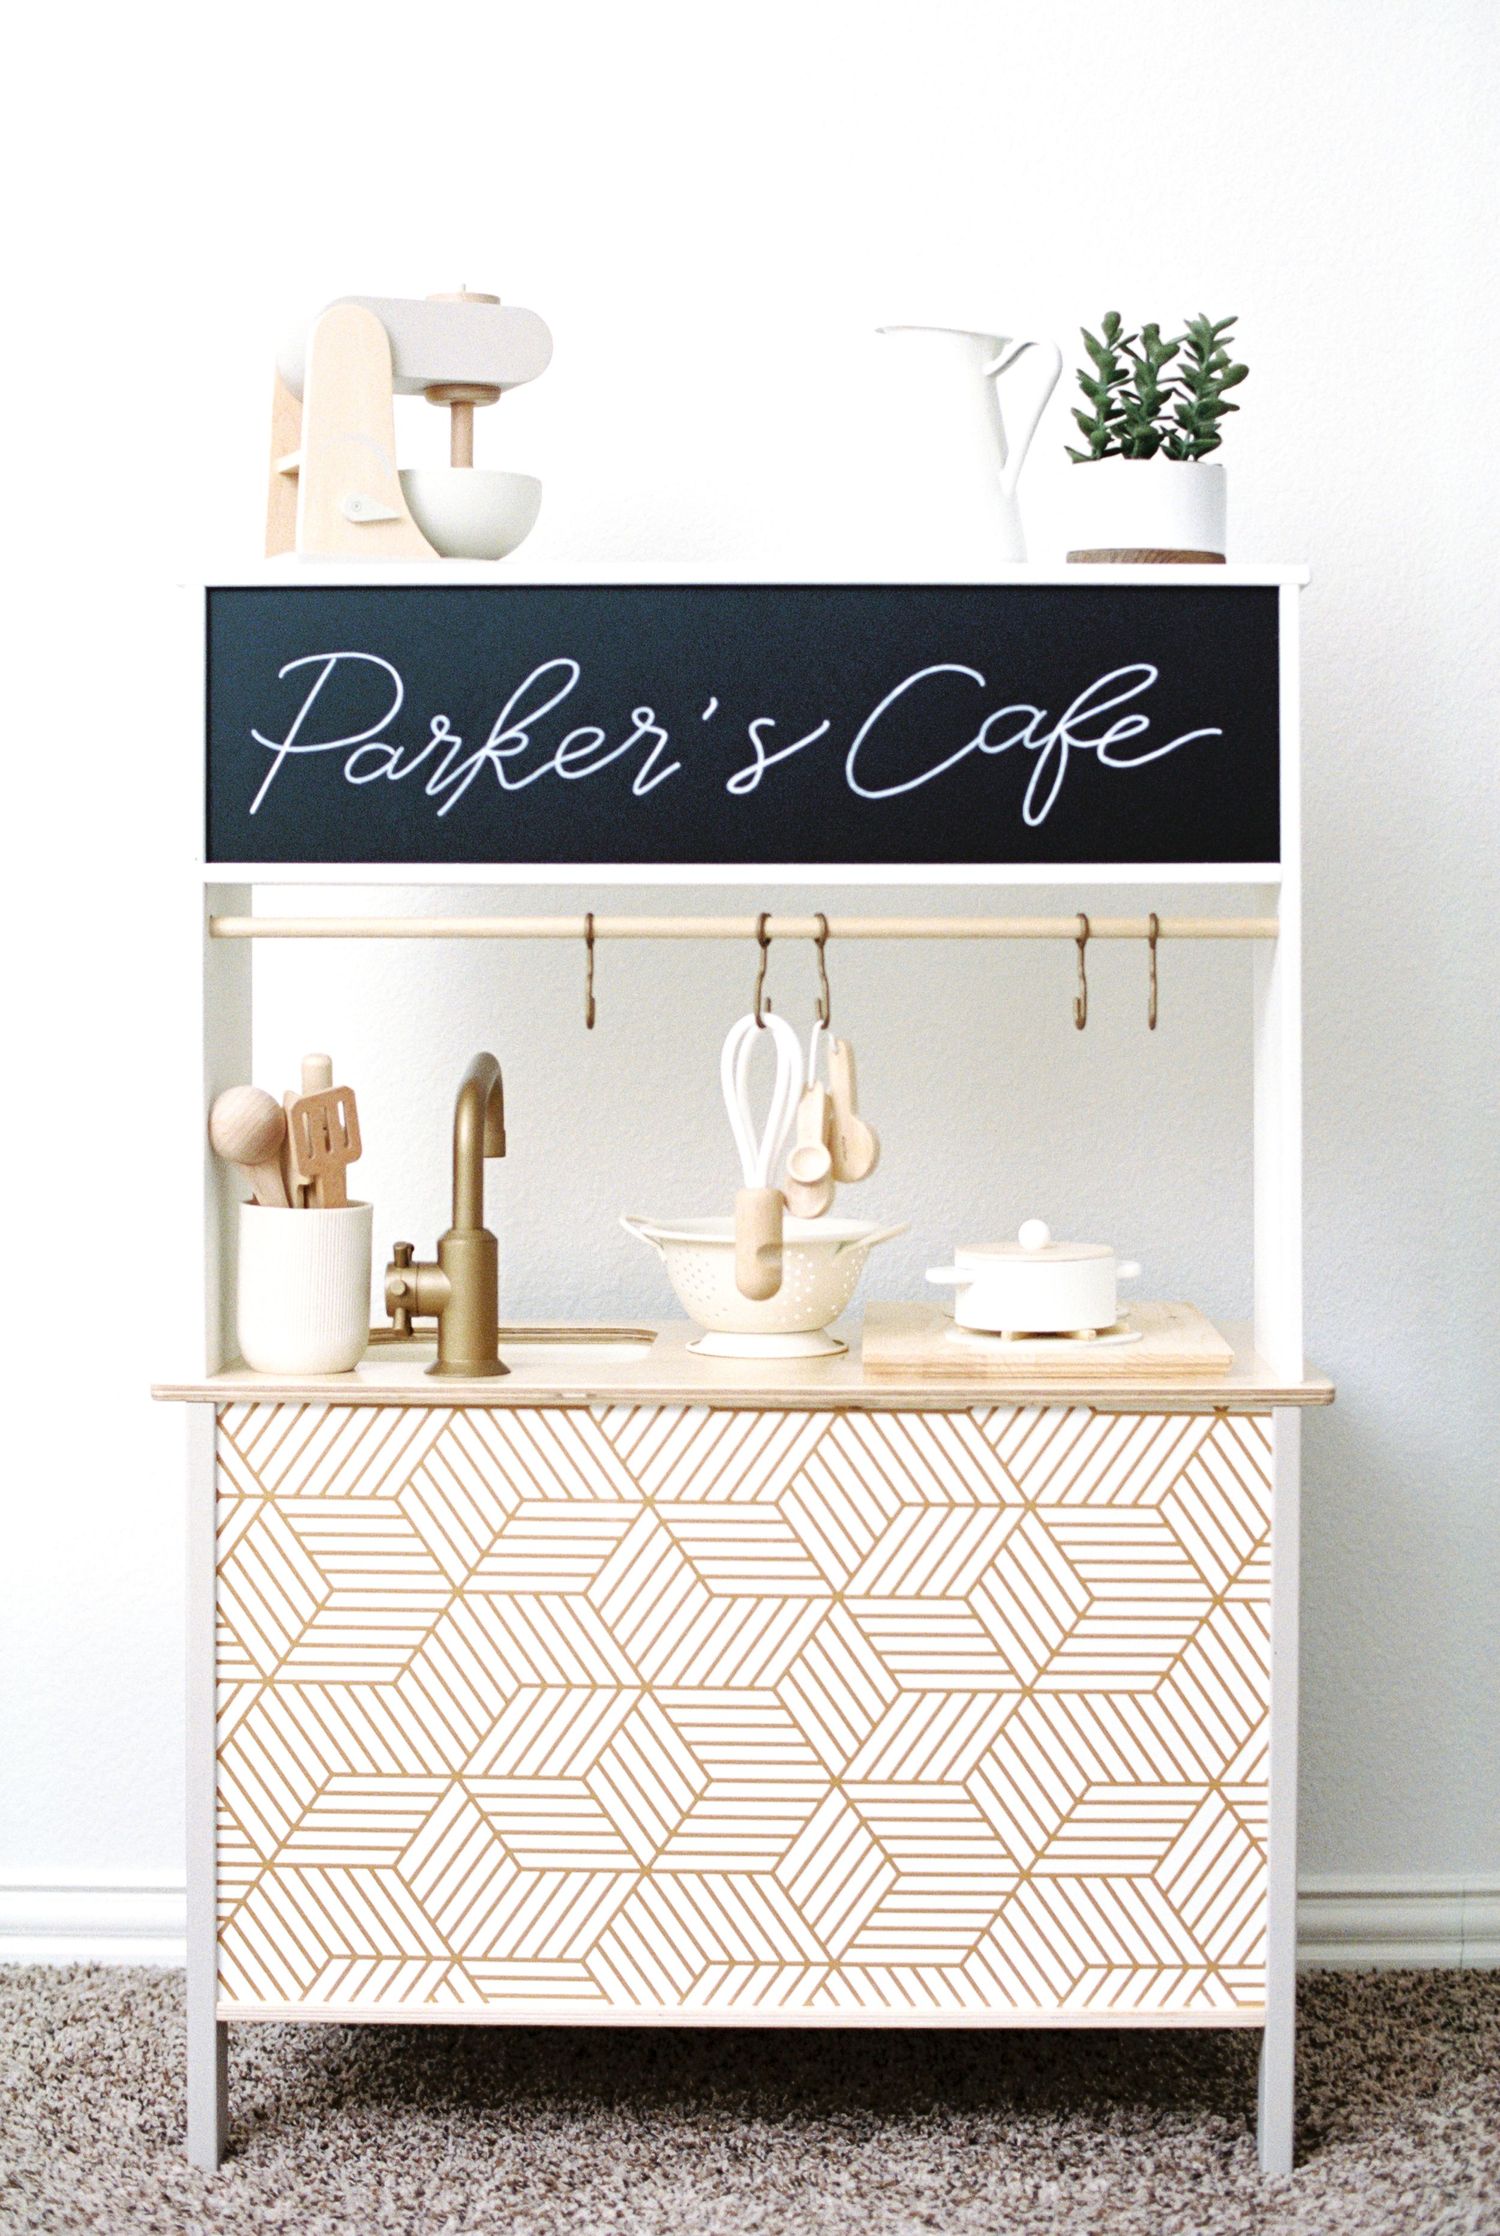
There wasn't one blog that had exactly what I wanted, so I took inspiration and elements from a few different ones. I LOVE sage as cabinetry color (and color in general), but I knew I wanted something that would be more neutral and timeless, something I won't get sick of after a while. So I decided on a greige for the bottom cabinets, and a light wood for trims and accents, as well as white for the top shelves, and brass as the metal accents. I also saw on one of the blogs that their microwave and oven lights up when you open them, so I hunted all over the internet to find these magnet lights. Amazon sells them but at the time I was planning the design, they were out of stock and I wasn't sure when it would be back. I think I waited 2 months before they came back in stock and I bought it right away, just in time for when I was actually in the middle of the makeover. I wanted a shop option too, so I didn't put a backsplash in like many Pinterest ideas had, that way if she ever decided she wanted to open a shop instead of just having a kitchen, it's already decked out with a chalkboard sign on top and a cute gold geo wallpaper on the bottom. Which is also why I didn't want to do a floating microwave like some others, especially since we knew the playroom would be constantly evolving as she grows, and aside from the Kallax, we didn't want to mount too much stuff down. All the links to sources and shops are at the bottom of the blog!


For two weeks straight, I sprayed every morning as soon as I put Parker down for her nap, around 9:30am, while it's still cool but not damp in June in TX. I set up all the cardboard outside the garage where there's shade, set up the fan, and bring everything out to spray. I hand-sanded the pieces and wiped every piece down with a used dryer sheet just before spraying. Then I sprayed 2 coats back to back, let the paint dry for an hour or two, come back out and spray 2 coats again. After that's all done I bring everything in and do it all over again the next day. Sometimes if I didn't have enough time, I would just bring everything in just after 2 coats, and then wait a few hours before sanding the pieces. It was a tedious process no less, and I honestly wish I took my time more and didn't rush the project as much, but I was taking over the garage for too long and I had other work that demanded my attention, not to mention my daughter. In another life, I'd love to just do this as a hobby, maybe for my grandkids (?!).


I definitely considered hand-painting the kitchen or using a spray gun with regular wall paint to paint the kitchen, in fear that the spray paint would easily mess up. But I decided to take the risk and use spray paint and I must say, it was well worth it. There were a few mistakes and the kitchen isn't perfect; there were definitely things I messed up on. But it was still easier to spray paint and not be tethered to a spray gun, and set up AND clean up were WAY easier than hand painting or pouring out wall paint onto a tray etc. I believe I went through 5 cans per main color and top coat sealer, and 1 can for the accent colors. I didn't need to use a sander for anything, hand sanding did just fine with a 120-150 fine grit sandpaper. It was really important to keep sanding in between layers and before spray painting at all. Sanding helps keeps the surface smooth and allows the paint adhere to the surface better. The only things I had to ask my hubby to help with was to drill holes for the wooden knobs, and to attach the undermount sink, only because my wrists were hurting and the drill was too much for me. Otherwise the sawing, assembling, all the spray painting, wood glueing, I proudly did on my own.


Instructions
- Layout pieces to decide which ones need to be painted. I grouped them by color so it made it easy for me to spray one group by color at a time.
- Mark inside & outside & what/ where to paint
- Blue tape with butcher paper
- Blue tape up accessories (if you have any that would be sprayed in the same color as the kitchen) (I did spray paint the kitchen mixer, colander, and the pot)
- Cut holes in cardboard boxes to hold the faucet upright
- Hand sand with fine grit sandpaper the wooden pieces that needs to be sprayed (I didn't prime anything since the spray paint already had primer)
- 4-8 layers of color on each side (2 coats back to back, then let dry for an hour before spraying another 2 coats)
- Lightly hand sand after spray paint dries, and before spraying on the next 2 coats, to keep the surface smooth
- Spray plastic accessories (no need to sand)
- 4-6 layers of top coat sealer on everything
- Remove blue tape (the most satisfying part!)
- Stick & peel the back with gold wallpaper (base)
- Stick & peel chalkboard wallpaper top back
- Saw 1/2" round wooden dowel to size for the hooks (I used the IKEA plastic one as a length guide)
- Create stovetop: spray large round pieces x2 in white/ cut square 1/4" dowels to size (roughly 1.5" long)/ wood glue 6 dowels & 3/4" round wood pieces to one large round piece/ wood glue large round piece to wood plaque/ Seal entire stovetop with top coat sealer
- Mark holes for stove knobs
- Drill 4 holes for stove knobs
- Attach knobs & handles to kitchen pieces
- Drill sink with 5/8" wood screws (undermount style)
- Wood glue stovetop to countertop (glued it upside down so the ridges were facing down and hidden)
- Assemble entire kitchen together
- Attach the magnet lights in oven and microwave
- Seal wood handles with wood conditioner (not necessary but will help keep the wood in lasting condition)


Tips
I definitely learned a few lessons along the way during this makeover process. Hopefully these tips will save you the time of having to learn it yourself the long way!
- Get the spray paint with the primer included
- Definitely get an aspirator mask, or at least a KN95 mask. I didn't have one with me the first week thinking I'd be fine since I'm only spraying for 5-10 minutes and have the fan blowing, but it got woozy quickly
- LIGHTLY Spray (by not holding down for too long)
- Spray at a distance (minimum 10" away to prevent pools of paint and gets the misting more even throughout)
- Spray as straight as possible (it's ok to go at an angle but not for too long since it can cause pooling to happen too)
- Go slow and don’t concentrate on one spot, and move evenly back and forth, DON'T RUSH!
- CHECK weather (spray when its not too humid and not too cold to avoid crackIng or bubbling)
- When in doubt, check spray can's instructions (different paint colors will have slightly different instructions)
- Blast a fan outside, but angle it away from the spray so that it's not messing with the spray paint (the fan is used to circulate the toxic smell away quickly)
- Make sure everything is taped
- Use paper towel to dab if it pools a little, wait for it to dry, then lightly sand it with sandpaper manually before respraying another layer
- Use lots of boxes to elevate items for spraying
- Spray 2 coats back to back then wait 1-2 hours for another 2 coats (minimum 4 coats on each side, I think I did 8 coats total)
- Don’t forget to use clear seal at the end after drying for 72 hours
- Dry to touch is not dry. I waited about a week before assembling
- Fine grit sand paper to refine pieces manually after every 2 coats sprayed
- This one is SUPER important! Wipe down every piece before spraying each time with used dryer sheets to avoid bubbling. Any dirt or dust can cause paint to bubble and crack, which then I had to sand, then respray several times. Weather is not the only thing that will cause spray paint to bubble and crack.


Shop the Products
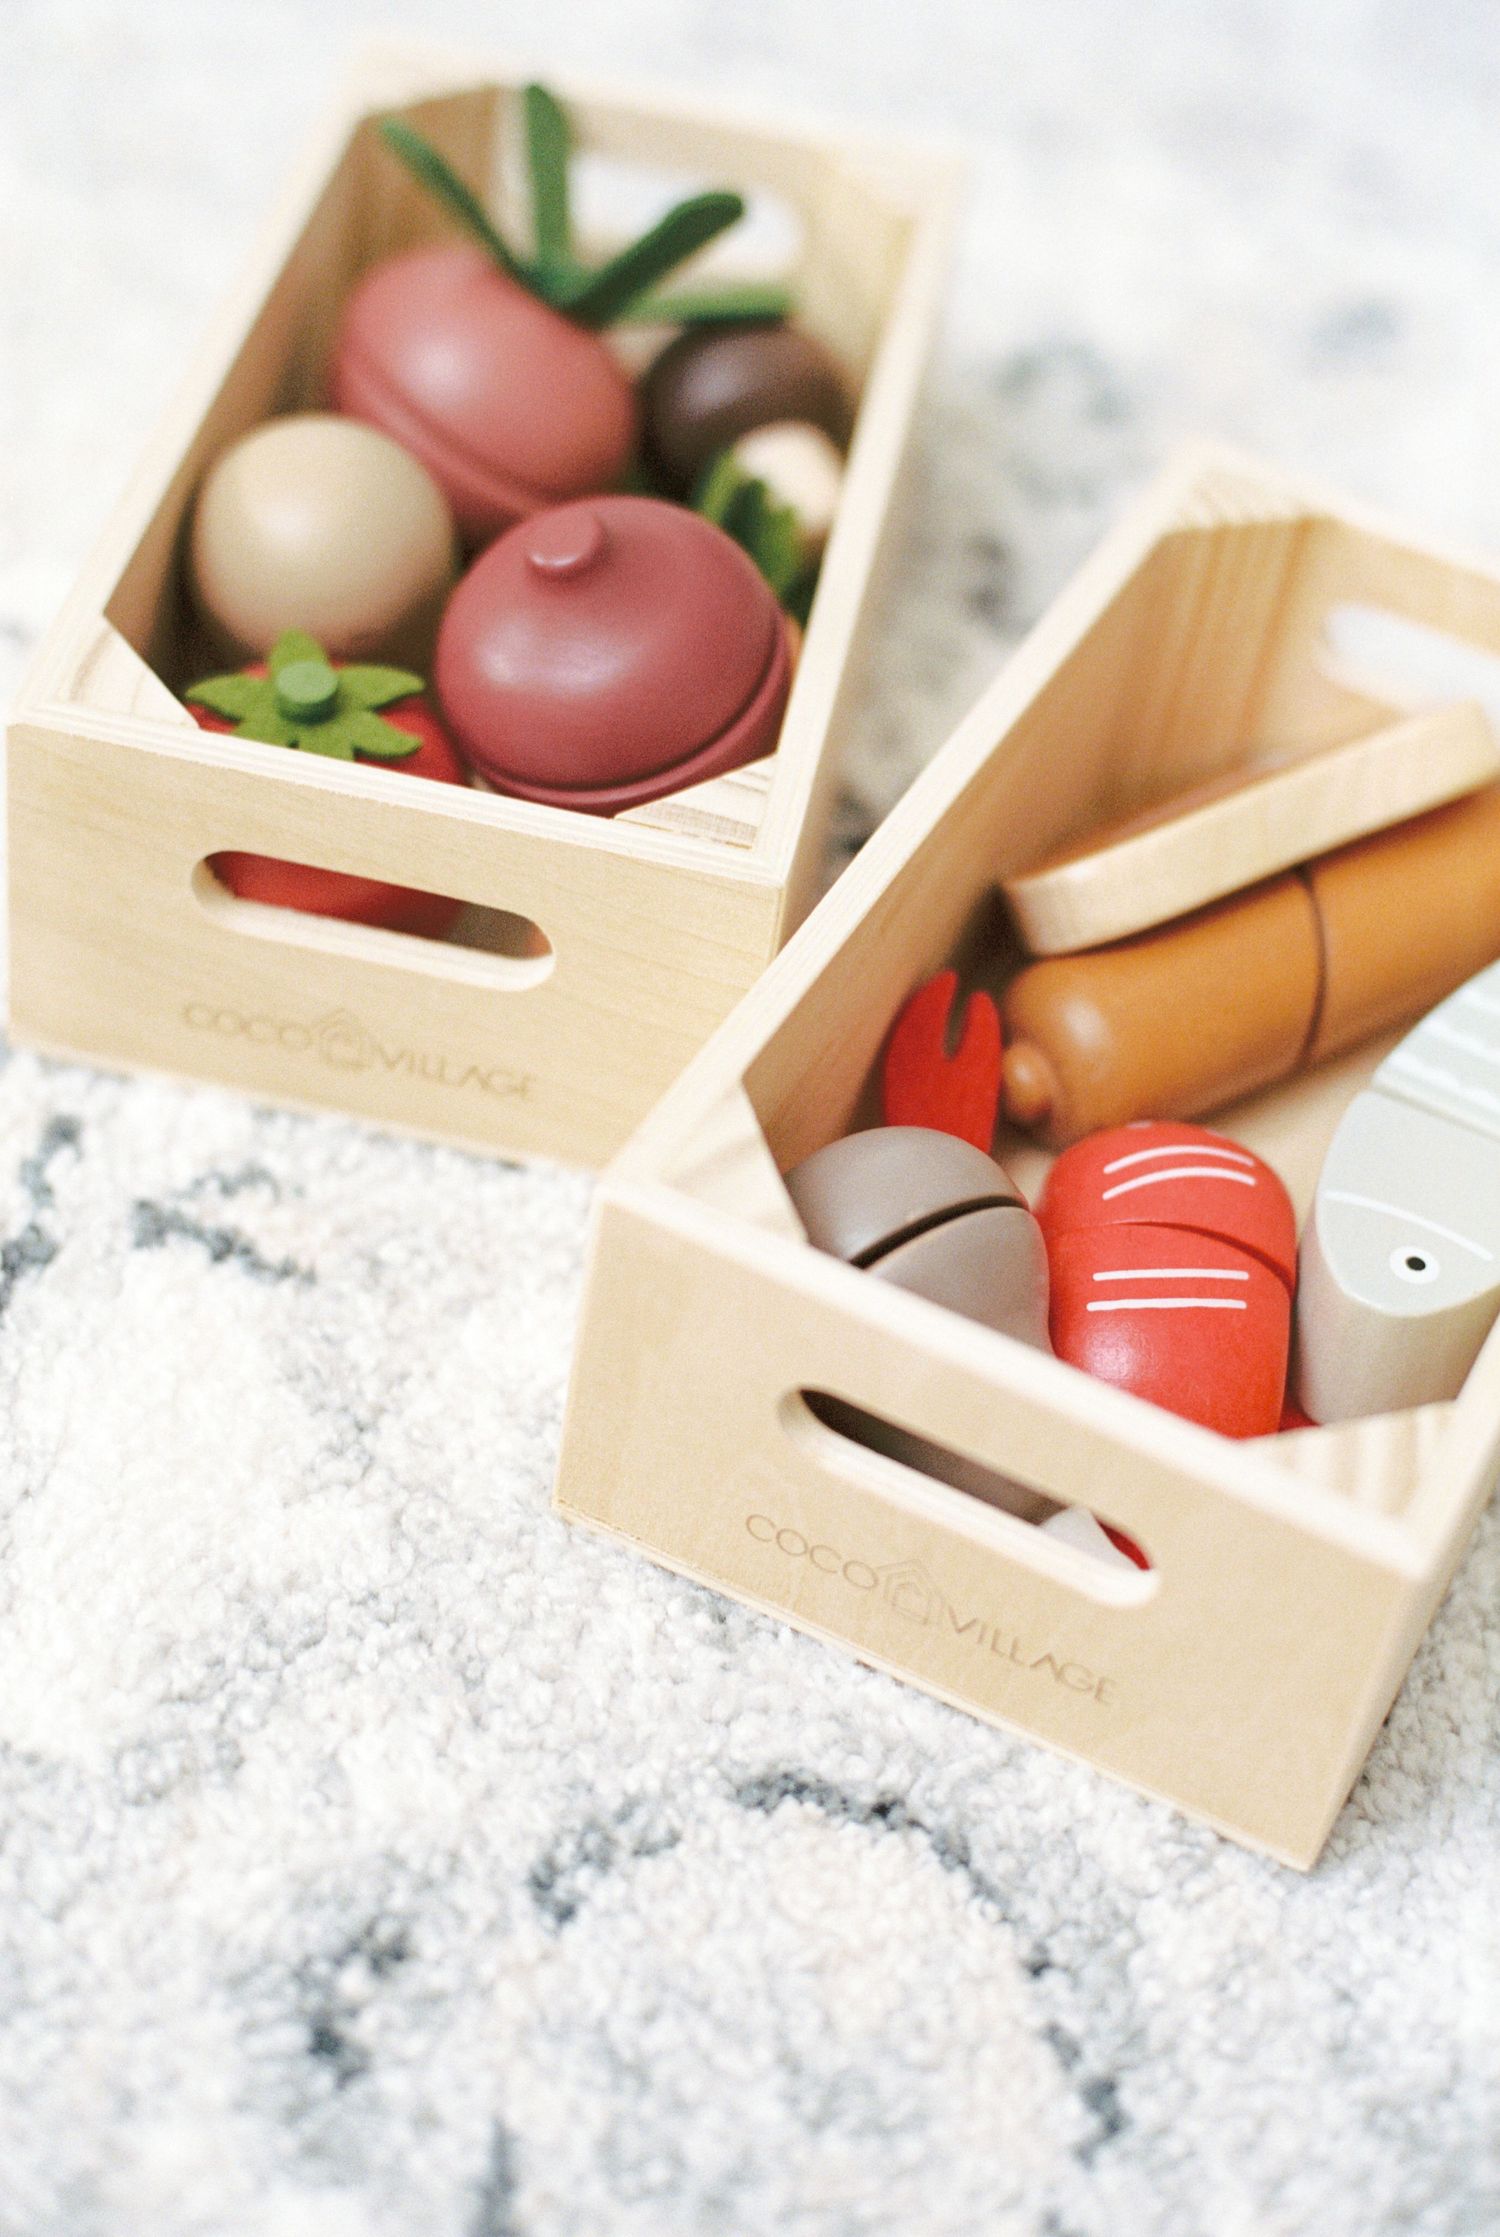
Play Kitchen | Top Coat | Top Shelves Paint | Base Cabinets Paint | Sink + Colander Paint | Gold Accent Paint | Wooden Knobs + Handles | Stovetop Wood Pieces | Stovetop Board | Microwave + Oven Light | Utensil Holder | Gold Wallpaper | Chalkboard Wallpaper | Toy Mixer | Pitcher | Colander | Toy Pots & Pans | Toy Sushi Set | Toy Bread Basket Set | Toy Baking Tools Set | Toy Meat Set | Toy Veggies Set | Toy Fruit Set | Toy Birthday Cake | Toy Drinks Set | Toy Herbal Jars |
Inspirations
Kandis Marino | The Heinrich House | Emelbe Design | Almost Makes Perfect | The Elle in Love | Lauren Konrad | Tiffanie Anne |
If you have more questions about this play kitchen makeover, feel free to DM me on IG or email me!
